


There’s an art to cooking teh perfect steak-one that’s tender, juicy, and seared to mouthwatering perfection. Enter the reverse sear: a method that’s quietly revolutionizing kitchens by flipping the traditional steak-cooking process on its head. Rather of starting with a hot pan and risking overcooked interiors, the reverse sear gently brings the meat up to temperature before delivering that final, caramelized crust. If you’ve ever struggled with uneven doneness or dreaded the dry edges of an overcooked steak, mastering the reverse sear promises a flawless result every time. In this article, we’ll unravel the science behind the technique, guide you step-by-step, and share pro tips to help you turn an ordinary cut of beef into a restaurant-worthy masterpiece. Prepare to elevate your steak game beyond the ordinary-your taste buds will thank you.
Mastering the reverse sear technique unlocks the secret to steakhouse-quality results right in your own kitchen. This method, acclaimed by chefs worldwide, involves gently cooking your steak at a low temperature until it reaches near-perfect doneness before finishing with a blazing hot sear to develop an irresistible crust. Understanding the science behind this approach transforms your steak from merely good to extraordinary, ensuring juiciness, tenderness, and flavor in every bite.
prep and Cook Time
- Planning: 10 minutes
- Cooking: 40-60 minutes (depending on thickness)
- Resting: 10 minutes
- Total Time: Approximately 1 hour 15 minutes
Yield
- Serves 2
Difficulty Level
- Medium – requires attention to temperature and timing
Ingredients
- 2 thick-cut ribeye steaks (1.5-2 inches thick, about 12 ounces each, preferably USDA Prime or Choice)
- 1 tbsp kosher salt
- 1 tsp freshly ground black pepper
- 1 tbsp neutral oil with a high smoke point (e.g., grapeseed or canola oil)
- 2 tbsp unsalted butter
- 2 cloves garlic, lightly crushed
- 1-2 sprigs fresh thyme or rosemary
Instructions
- Bring the steaks to room temperature. Take your steaks out of the fridge at least 30 minutes before cooking. This promotes even cooking and prevents the outside from overcooking while the interior warms.
- Season liberally. Sprinkle the kosher salt and freshly ground black pepper evenly over both sides of the steaks, pressing gently to adhere. The salt enhances flavor and aids in developing a crust later.
- Preheat your oven. Set it to 275°F (135°C) – a precise low temperature to gently bring the steak’s internal temperature up without drying it out.
- Place steaks on a wire rack. Set the steaks on a wire rack over a rimmed baking sheet. This setup allows air circulation around the steak, promoting even cooking.
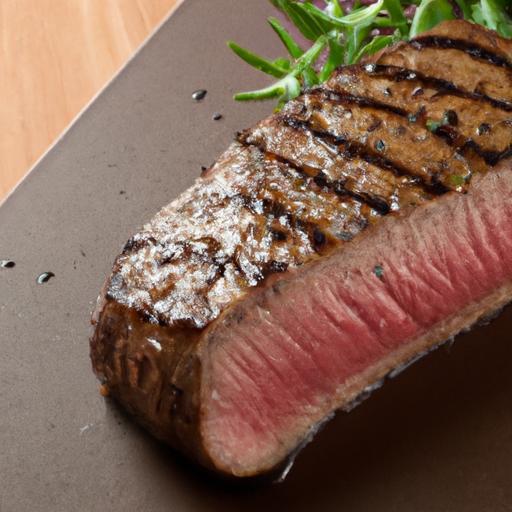
- Cook low and slow. Insert an instant-read thermometer into the thickest part of one steak. Roast in the oven until the internal temperature reaches 10-15°F below your target doneness (for medium-rare,aim for 115°F to 120°F,about 30-45 minutes depending on steak size).
- Rest before searing. Remove steaks from the oven and let them rest for 5-10 minutes. Resting redistributes juices and prevents moisture loss during searing.
- Prepare your pan. heat a heavy-bottomed cast iron skillet over high heat until almost smoking. Add the neutral oil and swirl to coat the surface.
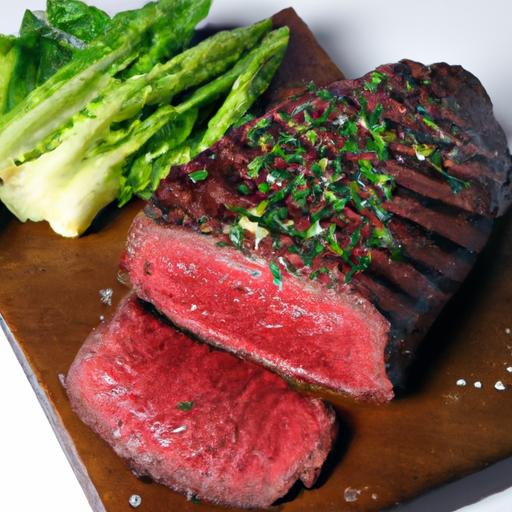
- Sear to perfection. Place steaks in the skillet and sear 1-2 minutes on each side, turning once or twice, until a deep golden-brown crust forms. Add butter, garlic, and herbs, basting the steaks continuously with melted butter for extra flavor and richness.
- Final rest. Transfer steaks to a plate and let rest 5 minutes before slicing. this brief rest ensures peak juiciness in every bite.
- Serve and enjoy. Slice against the grain and plate with your preferred sides.
Tips and Tools to Elevate Your Reverse Sear Experience
- Choose the ideal steak: Prime cuts with good marbling like ribeye, strip steak, or filet mignon perform best with the reverse sear. Thickness matters – 1.5 to 2 inches is ideal to prevent overcooking during searing.
- Precision temperature control: Using a reliable digital instant-read or probe thermometer is critical.This ensures you hit the perfect internal temperature before searing.
- Wire rack magic: Lifting your steak off the baking sheet lets heat circulate evenly, avoiding steaming and promoting uniform cooking.
- Don’t skip resting: Both post-oven and post-sear rests are essential to lock in moisture and flavor.
- Upgrade your searing pan: A preheated cast iron skillet or carbon steel pan delivers intense,even heat to create that coveted crust.
- Flavor infusion: Basting mid-sear with butter infused with garlic and herbs adds layers of mouthwatering aroma and complexity.
- Patience yields perfection: Resist upping oven heat or rushing the sear-low and slow before fast and hot is the mantra for success.
Chef’s Notes
- You can swap ribeye for New York strip or filet mignon, but adjust cooking times slightly based on thickness and fat content.
- For an extra smoky flavor, finish the steak with a quick 30-second torch sear after pan-searing.
- If you don’t have an oven thermometer, consider our guide to choosing a quality meat thermometer.
- Make-ahead option: Season steaks the night before and refrigerate uncovered for dry brining; this enhances flavor and texture.
Serving Suggestions
Present your perfectly reverse seared steak on a warm plate,garnished with a sprig of fresh thyme or rosemary. Pair the dish with creamy garlic mashed potatoes, sautéed baby spinach, or roasted seasonal vegetables for a balanced and elegant meal. A drizzle of pan juices or compound herb butter elevates the experience. Serve with a bold red wine like Cabernet Sauvignon or Malbec for a truly indulgent dinner.

| Nutrient | Amount (per serving) |
|---|---|
| Calories | 670 kcal |
| Protein | 55 g |
| Carbohydrates | 2 g |
| Fat | 48 g |
For more insights on grilling techniques, check out our Ultimate Grilling Guide. Further scientific background on heat transfer in cooking can be explored on Cook’s Illustrated.
Q&A
Q&A: mastering the Reverse Sear – Perfect Steak Every Time
Q1: What exactly is the reverse sear, and how does it differ from traditional steak cooking methods?
A1: The reverse sear is a two-step cooking technique that flips the conventional steak-cooking approach on its head. Instead of searing the steak first and then finishing it in the oven, you start by slowly cooking the steak at a low temperature, usually in the oven or on indirect heat, until it reaches just below your desired doneness. Then, you finish with a quick, high-heat sear to create a perfectly caramelized crust. This method ensures even cooking edge-to-edge and maximum juiciness.
Q2: why should I consider using the reverse sear method?
A2: If you’re chasing steak perfection, the reverse sear is your secret weapon. It solves the classic dilemma of overcooking the outer layers while trying to reach the ideal internal temperature. Since the steak heats evenly during the slow cook, you avoid that dreaded band of gray, overcooked meat near the edges. Plus, the final sear locks in juices and unleashes an irresistible crust packed with flavor.
Q3: what types of steak cut best lend themselves to the reverse sear technique?
A3: Thick-cut steaks-think ribeyes, strip steaks, and filet mignons over 1.5 inches thick-are perfect for reverse searing. Their thickness allows for that gentle low-and-slow cook without drying out, and the quick sear adds a delicious crust. Thinner cuts might cook too quickly or lose their tender texture using this method.Q4: Can you walk me thru the basic steps of a reverse sear?
A4: Absolutely!
- Prepare your steak: Season liberally with salt, pepper, and any herbs or spices you love.
- Slow cook: Place the steak on a wire rack over a baking sheet and roast it in a preheated oven at 225°F (107°C) until it’s about 10-15°F below your target temperature (e.g., 115°F for medium-rare).
- Rest briefly: Let it sit for 5-10 minutes to settle the juices.
- Sear for perfection: Heat a cast-iron skillet or grill to high heat, add a touch of oil, and sear the steak 1-2 minutes per side until a deep brown crust forms.
- final rest: Let it rest again, slice, and enjoy that perfectly cooked steak!
Q5: How do I know when to remove the steak from the oven before searing?
A5: Use a reliable instant-read thermometer and pull the steak when it’s about 10-15°F lower than your desired final temperature.Becuase the searing step adds heat and drives the temperature up a bit, starting lower ensures you hit your perfect doneness without overcooking.
Q6: Any tips for the best crust during the searing step?
A6: High heat is your friend! Make sure your pan or grill is screaming hot before the steak hits it. Pat the surface dry to avoid steam,and brush on a thin layer of high-smoke-point oil like grapeseed or avocado oil. Butter and fresh aromatics like garlic or thyme added halfway through the sear can elevate the crust flavor to gourmet status.
Q7: Can I reverse sear steak on a grill, or is it only for ovens?
A7: You can absolutely reverse sear steak on a grill! Use a two-zone fire: place the steak on the cooler side for the low-and-slow cook, then move it to the hot side to sear. this method is fantastic for adding a subtle smoky char alongside the gorgeous crust.
Q8: What about resting – why is it essential for the reverse sear?
A8: Resting lets the steak’s juices redistribute evenly throughout the meat, preventing them from spilling out the moment you slice in. Rest both after the slow cook and after the high-heat sear to ensure every bite is juicy and tender.
Q9: Can reverse sear work with other meats?
A9: Yes! While perfected for steak, the reverse sear method shines with thicker cuts of pork, lamb, and even chicken breasts. The gentle initial cooking ensures tenderness, while the final sear adds irresistible flavor and texture.
Q10: Any common mistakes to avoid when reverse searing?
A10: Overcrowding the pan during searing can steam your steak instead of crusting it, so sear one steak at a time. Avoid skipping the low-and-slow step-it’s the heart of why this technique works. don’t neglect resting; impatient cutting leads to dry steak drama.
Mastering the reverse sear isn’t just about technique-it’s a love letter to the craft of steak cooking. With patience, attention, and a bit of practice, you’re on your way to steak nirvana, every time.
The Conclusion
With the reverse sear in your culinary arsenal, achieving steakhouse-worthy perfection is no longer a distant dream but an accessible reality. This method’s gentle precision unlocks tenderness while the final sear delivers that irresistible crust, marrying texture and flavor in every bite. Whether you’re a seasoned grill master or an enthusiastic home cook, mastering the reverse sear transforms steak from a simple meal into a festivity of technique and taste. So fire up your oven, ready your skillet, and step confidently into the world where every steak tells a story of patience, skill, and undeniable deliciousness. Your perfect steak awaits-one reverse sear at a time.