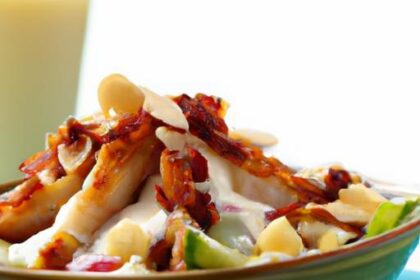


There’s something undeniably satisfying about biting into a perfectly crispy chicken tender-golden, crunchy on the outside, tender and juicy on the inside. Whether served as a quick snack,a family dinner favorite,or a party crowd-pleaser,homemade chicken tenders bring together comfort and crave-worthy texture in every bite. In this article, we’ll unravel the secrets behind crafting those irresistibly crispy coatings and share step-by-step tips to elevate your homemade chicken tenders from ordinary to extraordinary. Get ready to roll up your sleeves and savor the crunch!
Crunchy Delight: How to Make Crispy Homemade Chicken Tenders
Crunchy delight comes alive when you master the art of selecting the right chicken cuts,layering the perfect crispy coating,and cooking with technique that locks in juiciness beneath irresistible golden crunch.this recipe transforms humble chicken tenders into a crave-worthy culinary experience you’ll want to share again and again. Whether it’s a family dinner or a casual gathering, the magic lies in the balance of tender meat and crisp, flavorful coating that dances on your palate.
Prep and Cook Time
- Preparation Time: 20 minutes
- Cook Time: 15 minutes
- Total Time: 35 minutes
Yield
Serves 4 (approximately 16 chicken tenders)
Difficulty Level
Easy
Ingredients
- 1½ pounds chicken tenderloins, trimmed
- 1 cup buttermilk
- 1 teaspoon garlic powder
- 1 teaspoon smoked paprika
- ½ teaspoon salt
- ½ teaspoon black pepper, freshly ground
- 1 cup all-purpose flour, sifted
- 1 cup panko breadcrumbs, for extra crunch
- ½ cup cornmeal (optional, for added texture)
- 1 teaspoon cayenne pepper (adjust to taste)
- 2 large eggs, beaten
- Vegetable oil or peanut oil, for frying (about 2 cups)
Instructions
- Marinate the chicken: In a large bowl, combine buttermilk, garlic powder, smoked paprika, salt, and black pepper. submerge the chicken tenderloins in the mixture.Cover and refrigerate for at least 30 minutes, or up to 4 hours for maximum tenderness and flavor infusion.
- Prepare the coating station: In one shallow dish, whisk together the flour, panko breadcrumbs, cornmeal, cayenne pepper, and a pinch of salt. In a separate bowl, beat the eggs untill smooth.
- Coat the chicken: Remove each tenderloin from the buttermilk, shaking off excess liquid.dip first into the egg, then dredge thoroughly in the flour mixture, pressing gently so the coating adheres well. Set coated tenders on a wire rack and let rest for 10 minutes to help the crust set.
- Heat the oil: In a large, heavy-bottomed skillet or deep fryer, pour oil to a depth of about 2 inches. Heat oil to 350°F (175°C). Use a candy or deep-fry thermometer for accuracy; the right temperature is crucial for that golden crunch and juicy interior.
- fry the tenders: Carefully place tenders in hot oil in batches, not overcrowding the pan. Fry for 4-5 minutes per side until crust is deep golden brown and chicken reaches an internal temperature of 165°F (74°C).Turn gently to avoid breaking the crust. Remove with a slotted spoon and drain on paper towels.
- Serve hot: Let tenders rest for 2 minutes, then serve immediately with your favorite dipping sauces.
Tips for Success
- Choosing the cuts: Use chicken tenderloins or strip steaks just beneath the breast for natural tenderness. Avoid thicker breast meat which can dry out.
- Double-dip for extra crunch: For an ultra-crispy coat, repeat the dip in egg and flour mixture once more before frying.
- Temperature timing: Maintain oil temperature between 350-360°F. too hot burns the crust; too cool makes it soggy.
- Make-ahead: Coated chicken tenders can rest in the fridge for up to 1 hour before frying, allowing coatings to adhere better.
- Substitutions: Swap buttermilk for plain yogurt thinned with milk for tangy tenderness. Use gluten-free flour blends and panko for dietary needs.
Serving Suggestions
Present your chicken tenders on a rustic wooden board or radiant ceramic platter, garnished with fresh chopped parsley or cilantro for color contrast. Pair with crispy sweet potato fries or a crisp green salad for a balanced meal. Don’t forget vibrant dipping sauces-classic honey mustard, tangy sriracha mayo, or rich blue cheese dressing truly elevate the experience.
Flavor Boosters and Dipping Sauces
- Honey Garlic Aioli: Mix mayonnaise with honey, minced garlic, lemon juice, and a pinch of smoked paprika.
- spicy Ranch Dip: Combine ranch dressing with a dash of cayenne, fresh chopped dill, and lime zest.
- Classic BBQ Sauce: A smoky, tangy house-made barbecue sauce complements the crisp texture perfectly.
| Nutrient | Per Serving |
|---|---|
| Calories | 320 |
| Protein | 28g |
| Carbohydrates | 18g |
| Fat | 15g |
Craving more crispy delights? Explore our Crispy Buffalo Wings Recipe for a fiery twist on crunch.
For food safety and cooking temperatures, visit USDA Safe Minimum Cooking Temperatures.

Q&A
Q&A: Crunchy Delight – How to Make Crispy Homemade Chicken Tenders
Q1: What’s the secret to achieving that perfect crispy texture on homemade chicken tenders?
A1: The crunch factor comes down to a combination of the right coating and cooking technique. Start with a double-dredge method-dip your chicken strips first in seasoned flour,then in a beaten egg wash,and finally coat them in panko breadcrumbs. The panko adds an unbeatable light, airy crispness.Also, frying at the right temperature (around 350°F or 175°C) ensures the coating crisps up without absorbing too much oil.
Q2: Can I bake the chicken tenders instead of frying to keep them crispy?
A2: Absolutely! Baking can yield deliciously crispy tenders with less oil.To maximize crunch, lightly spray the coated tenders with cooking spray and bake on a wire rack so air circulates around each piece. This mimics the frying environment and prevents sogginess. Bake at 425°F (220°C) for about 15-20 minutes, turning halfway through for even browning.
Q3: How can I add extra flavor to my crispy chicken tenders?
A3: Flavor is your playground. Marinate the chicken in buttermilk with a pinch of paprika, garlic powder, and cayenne for a subtle tang and hint of spice. For the coating,mix herbs like dried oregano or thyme into your flour or breadcrumbs. Adding parmesan cheese to your breadcrumb mix also gives a savory punch that pairs beautifully with the crispy texture.
Q4: What type of chicken is best for homemade tenders?
A4: chicken tenderloins are the classic choice-they’re naturally tender and ideal for a quick, even cook. Alternatively, you can slice boneless, skinless chicken breasts into strips. Just be sure to pound them to an even thickness to ensure uniform cooking and a consistent crunchy crust.
Q5: How do I prevent the breading from falling off during cooking?
A5: The key lies in patience and technique. After dredging your chicken in flour, egg, and breadcrumbs, let the coated pieces rest on a cooling rack for 10-15 minutes before cooking. This helps the breading “set” and stick firmly.Also, avoid overcrowding your pan or baking sheet so the tenders cook evenly without getting soggy.
Q6: What dipping sauces pair best with crispy homemade chicken tenders?
A6: The classic combo never fails-think tangy honey mustard or smoky barbecue sauce. For a zesty kick, whip up a sriracha mayo or a lemon-garlic aioli. Sweet chili sauce or a creamy ranch also complement the crunchy texture and savory flavor beautifully, inviting you to dip and savor every bite.
Q7: How can I make this recipe healthier without sacrificing crunch?
A7: Swap out customary breadcrumbs for whole wheat or crushed cornflakes for a wholesome crunch. Try oven-baking instead of frying, and use an air fryer if you have one-it uses far less oil but still delivers that coveted crisp texture. Also, incorporating seasoning directly into the coating minimizes the need for salty dipping sauces, keeping your tenders flavorful and lighter.
Q8: Any tips for serving crispy chicken tenders in style?
A8: Presentation elevates the experience! Serve your tenders on a bed of crisp lettuce or colorful slaw to add freshness. Garnish with chopped herbs like parsley or chives for a pop of color. Don’t forget a trio of dipping sauces in small bowls-they make your plate look inviting and cater to every taste bud. Pair with sweet potato fries or roasted veggies for a balanced, irresistible meal.
With thes tips in hand, your kitchen is ready to transform simple chicken into a crunchy delight that’ll have everyone reaching for seconds!
To Wrap It Up
There you have it-a crispy, golden-brown masterpiece that transforms humble chicken tenders into a crunchy delight worth savoring.Armed with these simple techniques and a few key ingredients, you can recreate the satisfying snap of perfectly crisp chicken right in your own kitchen anytime you crave it.So next time hunger strikes, ditch the takeout and treat yourself to homemade tenders that are as flavorful as they are irresistibly crunchy. happy frying, and may your kitchen always be filled with the tempting aroma of crispy goodness!