


When teh craving for something sweet strikes but the thought of turning on the oven feels like a chore, no-bake dessert bars come to the rescue. These effortless treats combine convenience with deliciousness, allowing you to whip up irresistible sweets without breaking a sweat. From gooey chocolate ganaches to nutty granola layers, no-bake bars are the perfect solution for busy days, impromptu gatherings, or a simple indulgence any time of year.In this article, we’ll explore a variety of easy-to-make recipes that transform simple ingredients into decadent delights-proving that sometimes, the best desserts require zero baking and all the love.
Why No Bake Dessert Bars Are Perfect for Busy Days
Effortless no-bake dessert bars are an inviting solution when time is tight but your cravings demand something sweet and satisfying.Born from the need for speedy treats without sacrificing flavor or texture, these bars combine creamy indulgence with delightful crunch without ever turning on the oven.Whether you’re juggling work, family, or just a hectic schedule, these dessert bars offer a fast, mess-free answer that feels homemade and irresistible.
The beauty lies in their simplicity: minimal ingredients, no baking, and endless room for customization. From the moment you press the base mixture into your pan, the welcoming aroma signals a sweet reward is near. These bars can be whipped up in under 30 minutes and chilled while you handle other chores, making them a perfect companion for busy days that deserve a little self-care through dessert.
Prep and Cook Time
- preparation Time: 15 minutes
- Chill Time: 1 to 2 hours
- Total Time: approximately 1 hour 30 minutes
Yield
About 12 bars, depending on portion size
Difficulty level
Easy – perfect for both beginners and seasoned dessert lovers
Essential Ingredients for Creating Delicious No Bake Bars
- 1 ½ cups graham cracker crumbs, finely crushed
- 1 cup rolled oats, for a hearty crunch
- ½ cup unsweetened shredded coconut, optional but adds texture
- ¾ cup creamy peanut butter, or any nut/seed butter of your choice
- ½ cup honey or pure maple syrup for natural sweetness
- 1 ½ cups semi-sweet chocolate chips, divided
- 1 teaspoon pure vanilla extract, for depth
- ¼ teaspoon sea salt, to balance sweetness
Step by Step Guide to Crafting the Ultimate Creamy and Crunchy Bars
- Line an 8×8 inch square pan with parchment paper, allowing some overhang for easy removal.
- In a medium bowl, combine graham cracker crumbs, rolled oats, and shredded coconut. Mix gently but thoroughly to distribute ingredients.
- In a microwave-safe bowl, warm peanut butter and honey for about 30 seconds until soft and pliable. Stir in vanilla extract and sea salt.
- Pour the peanut butter mixture over the dry ingredients. Using a spatula, gently fold until all crumbs are evenly coated and sticky.
- Press the mixture firmly into the prepared pan,ensuring an even,compact base. Use the bottom of a measuring cup to press firmly and create a smooth surface.
- In a small microwave-safe bowl, melt 1 cup of chocolate chips in 20-second intervals, stirring between each until smooth.
- Pour melted chocolate evenly over the pressed base, spreading it to the edges for a glossy, rich topping.
- Sprinkle the remaining ½ cup chocolate chips over the warm chocolate layer for textured bites and visual appeal.
- Refrigerate the bars for at least 1-2 hours until firm. This chilling step is crucial to set the structure and bring out the creamy, crunchy contrasts.
- Once set, lift the dessert out using parchment overhang and cut into 12 bars with a sharp knife, wiping clean between cuts for neat edges.
Expert Tips for Customizing Your No Bake Dessert Bars with Unique Flavors
- Swap the peanut butter for almond, cashew, or sunflower seed butter to change the nutty profile.
- Add a tablespoon of espresso powder to the chocolate topping for a mocha twist.
- Mix in chopped nuts, dried fruits, or mini marshmallows into the base for textural surprises.
- Use dark chocolate or white chocolate chips to vary the sweetness and richness.
- Infuse vanilla extract with a splash of orange zest or cinnamon for seasonal flair.
- For a vegan version, choose plant-based nut butter and maple syrup as the sweetener.
- Make ahead storage: these bars keep well refrigerated in an airtight container up to 1 week or freeze for up to 3 months.
Chef’s Notes
The key to the perfect bite is achieving balance between the creamy peanut butter and the crispiness of the base ingredients. Don’t be tempted to skip chilling as this allows the bars to fully firm up. When pressing the base, apply even pressure but avoid compacting too tightly to keep the texture light. If your mixture feels dry, add a teaspoon or two of warm honey or nut butter to help bind.
Feel free to experiment with the topping too – layering crushed pretzels or a sprinkle of sea salt before chilling can elevate the taste sensations to a new level.
Serving Suggestions
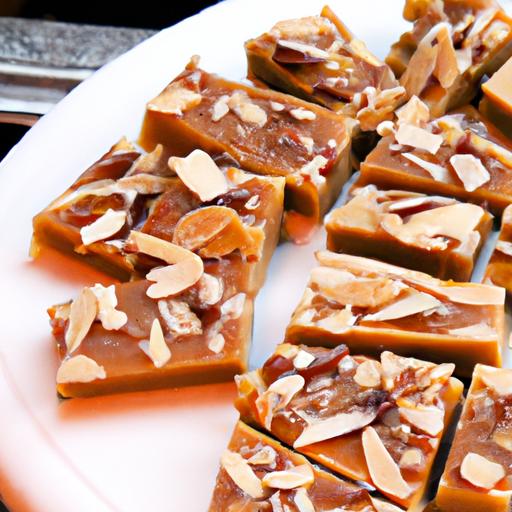
Present these bars on a rustic wooden board or a crisp white plate to highlight the contrasting textures and colors. Garnish with a sprinkle of chopped nuts, a drizzle of melted chocolate, or fresh raspberries for a pop of color and freshness. Pair with a cup of rich coffee or a glass of cold milk for a decadent yet effortlessly charming snack.

| Nutritional Info (per bar) | Calories | protein | carbs | Fat |
|---|---|---|---|---|
| Energy | 210 | 5g | 24g | 12g |
For more delicious recipes exploring quick and wholesome treats, check out our Quick No-Bake Snacks Collection.
Q&A
Q&A: Effortless No-Bake Dessert Bars: Sweet Treats Made Easy
Q1: What exactly are no-bake dessert bars?
A1: No-bake dessert bars are sweet treats that require zero time in the oven. Instead of baking, these bars set through chilling or simply combining ingredients-making them a quick, fuss-free option for satisfying your dessert cravings.
Q2: Why should I choose no-bake dessert bars over traditional baked ones?
A2: No-bake bars save you precious time and energy, especially on warm days when you want to avoid heating up the kitchen. Plus, they’re incredibly versatile, often requiring just a handful of ingredients and minimal equipment-perfect for beginners and busy bees alike.
Q3: What are some common ingredients in no-bake dessert bars?
A3: think crunchy bases like crushed cookies or nuts, creamy layers from cream cheese or condensed milk, and natural sweeteners such as honey, maple syrup, or chocolate. Ingredients like oats, peanut butter, and dried fruits often add texture and flavor, all stirred together with a pinch of creativity.
Q4: Can I customize no-bake dessert bars for dietary preferences?
A4: absolutely! No-bake dessert bars are superstar adapters. Swap dairy for coconut cream to go vegan, use gluten-free cookies or oats for gluten sensitivity, and try natural sweeteners in place of refined sugar. The possibilities are endless and delicious.
Q5: How long do no-bake dessert bars last, and how should I store them?
A5: These bars usually keep well in the fridge for about a week, making them great make-ahead snacks. For longer storage, you can freeze them for up to a month. Just make sure to store them in an airtight container to preserve freshness and flavor.
Q6: Any tips for perfecting my no-bake dessert bars?
A6: Patience is key-chilling time is crucial to let your bars set and firm up. Also, don’t skimp on the crust; a well-packed base creates the perfect foundation. Get creative with layering and toppings, like drizzling melted chocolate or sprinkling sea salt, to elevate your treats from simple to spectacular.Q7: What’s one beginner-friendly recipe to get started?
A7: Try the classic peanut butter and chocolate no-bake bar: mix crushed graham crackers with melted butter, press into a pan, top with a creamy blend of peanut butter and condensed milk, then drizzle melted chocolate on top. Chill for a few hours, slice, and enjoy!
Q8: Can kids get involved in making no-bake dessert bars?
A8: Definitely! As there’s no oven involved, kids can safely help mix ingredients, press mixtures into pans, and decorate the bars. It’s a fun, hands-on way to encourage little chefs to experiment in the kitchen with minimal mess and maximum joy.
Q9: are no-bake dessert bars suitable for special occasions?
A9: They sure are! Their eye-catching layers and customizable toppings make them a delightful addition to parties, potlucks, or festive gatherings. Plus, you can match flavors and colors to fit any theme or season-think peppermint bars at Christmas or tropical coconut bars for summer.
Q10: Where can I find inspiration for new no-bake dessert bar recipes?
A10: The internet is a treasure trove of ideas, with food blogs, cooking channels, and social media platforms like Pinterest and Instagram showcasing endless recipes. Don’t hesitate to experiment by blending your favorite flavors-sometimes the best bars come from delicious improvisation!
With these smart, simple insights, you’re all set to dive into the world of effortless no-bake dessert bars. Sweet treats have never been this easy-or this fun!
key takeaways
In the world of desserts, sometimes the simplest creations are the sweetest treasures. These effortless no-bake dessert bars prove that indulgence doesn’t have to come with a side of stress or a long list of ingredients. Whether you’re craving a quick weekday treat or planning a crowd-pleasing snack for your next gathering, these bars deliver rich flavors and delightful textures with minimal fuss. So next time your sweet tooth calls, remember: deliciousness is just a few no-bake steps away-ready to satisfy and impress, all without heating up your kitchen.