there’s a certain magic in desserts that come together without a flicker of heat-a kind of sweet simplicity that delights both the palate and the soul. No-bake dessert bars capture this effortless charm, blending rich flavors and tempting textures in a snap, all while freeing you from the oven’s grasp. Whether you’re a busy home cook craving quick indulgence or a dessert enthusiast seeking fresh inspiration, this guide to irresistible no-bake bars will open the door to a world where luscious treats meet ease and elegance. Get ready to discover recipes that prove sometimes, the simplest sweets are the most unforgettable.
Sweet Simplicity is the gateway to mastering no-fuss, irresistibly delicious no-bake dessert bars that delight every sense. Whether crafted for an impromptu gathering or a cozy treat, these bars blend bold, unexpected flavour combinations with effortless techniques that promise perfectly set, melt-in-yoru-mouth results every time.
Prep and Cook Time
Readiness: 15 minutes | Chill Time: 2 hours | Total Time: 2 hours 15 minutes
Yield
12 generous bars
Difficulty Level
Easy – Perfect for home bakers of all skill levels seeking quick, elegant desserts
essential Ingredients for perfectly Set and Irresistible Bars
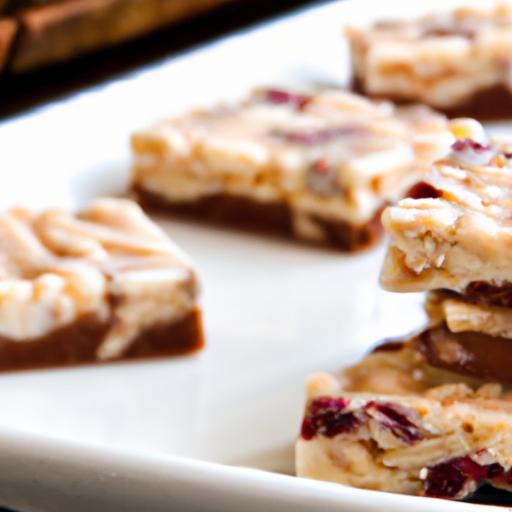
- 1 ½ cups rolled oats – for hearty texture and wholesome base
- 1 cup finely crushed graham crackers – adds delicate crunch and subtle sweetness
- ¾ cup creamy almond butter – the rich binder that lends a luxurious mouthfeel
- ½ cup pure maple syrup – natural sweetness that sets bars without cloying sugar
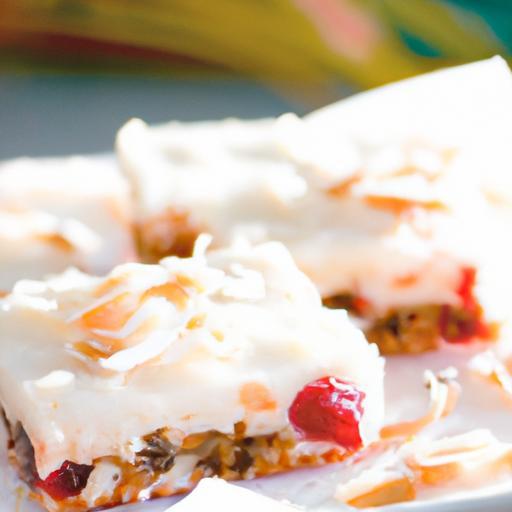
- ½ cup dark chocolate chips – for a smooth, decadent contrast
- ¼ cup shredded unsweetened coconut – imbues subtle tropical notes
- 1 tsp vanilla extract – enhances depth and complexity
- Pinch of sea salt – balances sweetness and intensifies flavor layers
Step-by-Step Techniques for Effortless No-Bake Creations
- Prepare your pan: Lightly line an 8×8-inch square baking dish with parchment paper, leaving an overhang on the sides for easy removal.
- Mix dry ingredients: In a large bowl, combine rolled oats, crushed graham crackers, and shredded coconut. Stir until evenly distributed, ensuring texture contrasts pop in every bite.
- Blend wet ingredients: In a small saucepan over low heat, gently warm the almond butter, maple syrup, and vanilla extract until silky and smooth, about 2-3 minutes, stirring constantly to prevent scorching.
- Combine and bind: Pour the warm almond butter mixture over the dry ingredients and sprinkle in a pinch of sea salt. Stir vigorously to create a cohesive, sticky base.
- Add chocolate chips: Let the mixture cool slightly (about 5 minutes) to prevent immediate melting, then fold in the dark chocolate chips, distributing them evenly without fully melting them-this adds delightful visual appeal and pockets of gooey chocolate.
- Press firmly: Transfer the mixture to the lined pan, pressing down evenly and firmly using the back of a spatula or clean hands, compacting for neat edges and a perfect bite.
- Chill to set: refrigerate uncovered for at least 2 hours, allowing the bars to firm up without becoming hard, maintaining a tender yet resilient structure.
- Slice and serve: Use the parchment overhang to lift the block from the pan. Slice into 12 bars with a sharp knife, wiping after each cut for clean edges.
Top Tips and Tools to Elevate your No-bake Dessert Game
- ingredient swaps: Try swapping almond butter for peanut butter or sunflower seed butter for nut-free options without losing creaminess.
- Sweetener alternatives: Use honey or agave syrup for nuanced sweetness; adjust quantity slightly if using denser syrups.
- Texture play: Add chopped toasted nuts or seeds for extra crunch and nutritional boost.
- Make-ahead magic: Store bars in an airtight container in the fridge for up to 5 days or freeze for up to 3 months-thaw before serving.
- Essential tools: A non-stick silicone spatula ensures easy mixing and spreading; parchment paper prevents sticking and eases bar removal.
- Prevent crumbling: Press the mixture tightly and refrigerate fully-this step is crucial for bars that hold shape beautifully.
serving Suggestions
Present these no-bake dessert bars as an elegant afternoon treat or a refined after-dinner snack. Garnish with a light dusting of powdered cocoa, a sprinkle of toasted coconut flakes, or a drizzle of melted dark chocolate for visual drama. Pair alongside a rich espresso or a chilled glass of milk for balanced indulgence.for a festive touch,top with fresh berries or a dollop of whipped cream just before serving.
| Nutritional Info (per Bar) | Calories | protein | Carbs | fat |
|---|---|---|---|---|
| No-Bake Almond Coconut Bars | 210 | 5g | 22g | 12g |
Discover more no-bake chocolate bars to expand your sweet simplicity repertoire.For further inspiration on ingredient nutrients, visit The Nutrition Source by Harvard T.H. Chan School of Public Health.

Q&A
Q&A: Sweet Simplicity – Your go-to Guide for Irresistible No-Bake Dessert Bars
Q1: What makes no-bake dessert bars so special compared to customary baked treats?
A1: No-bake dessert bars are the ultimate sweet shortcut-combining ease with indulgence. They require zero oven time, making them perfect for hot days, last-minute guests, or anyone who loves dessert without the wait. Their simplicity means you can whip up layers of flavor and texture while keeping your kitchen cool and your mood light.
Q2: What are the essential ingredients for crafting delicious no-bake dessert bars?
A2: The magic lineup usually includes a sturdy base like crushed cookies or nuts, a luscious binding agent such as melted butter or nut butter, and a dreamy filling-think creamy cream cheese, velvety chocolate, or sweetened condensed milk.Toppings can range from shredded coconut to chocolate chips or chopped nuts, adding both flair and crunch.
Q3: How can I ensure my no-bake bars set properly without baking?
A3: Patience is key! Most no-bake bars need chilling-usually in the fridge or freezer-to firm up. Using the right ratio of wet to dry ingredients helps too; too much moisture can lead to soggy bars. Also, pressing the base and layers firmly ensures a compact texture that holds together beautifully.
Q4: Can no-bake dessert bars be customized for dietary preferences?
A4: Absolutely! No-bake bars are wonderfully adaptable. For gluten-free options, substitute traditional cookies with gluten-free or nut-based crusts. Vegan versions can replace butter with coconut oil and use plant-based sweeteners and dairy-free fillings. The versatility is part of their charm!
Q5: What are some crowd-pleasing no-bake bar flavors to try?
A5: classics never fail-think rich peanut butter chocolate, tangy lemon cheesecake, or gooey caramel and sea salt bars. For adventurous palates, try matcha pistachio, coconut mango, or espresso almond bars. Each flavor profile delivers a unique twist while keeping things straightforward.
Q6: How should no-bake dessert bars be stored to keep them fresh and tasty?
A6: Store your bars airtight in the refrigerator to maintain firmness and freshness. Most last up to a week chilled, or you can freeze them for longer storage-just thaw briefly before serving. this makes them a perfect make-ahead treat for busy days or celebrations.
Q7: Any pro tips for elevating simple no-bake bars into show-stopping desserts?
A7: Layer like a pro! Combine contrasting textures-crunchy crust, creamy filling, and crunchy or gooey toppings. Use molds or trimming tools for clean edges, drizzle melted chocolate or caramel over the top, and sprinkle edible flowers or sea salt for that wow factor. Presentation is the final touch that transforms sweet simplicity into irresistible elegance!
In Retrospect
As you wrap up this journey through the world of no-bake dessert bars, remember that sweetness doesn’t have to be complicated to be unforgettable. With just a handful of ingredients and a pinch of creativity,you can craft treats that delight both the eyes and the palate-without ever turning on the oven. Whether you’re seeking a quick fix for a sudden craving or a charming homemade gift, these simple recipes prove that sometimes, the best indulgences come from the most effortless creations. So, go ahead-embrace the sweet simplicity, and let your next no-bake bar be your signature slice of delight.